Introduction
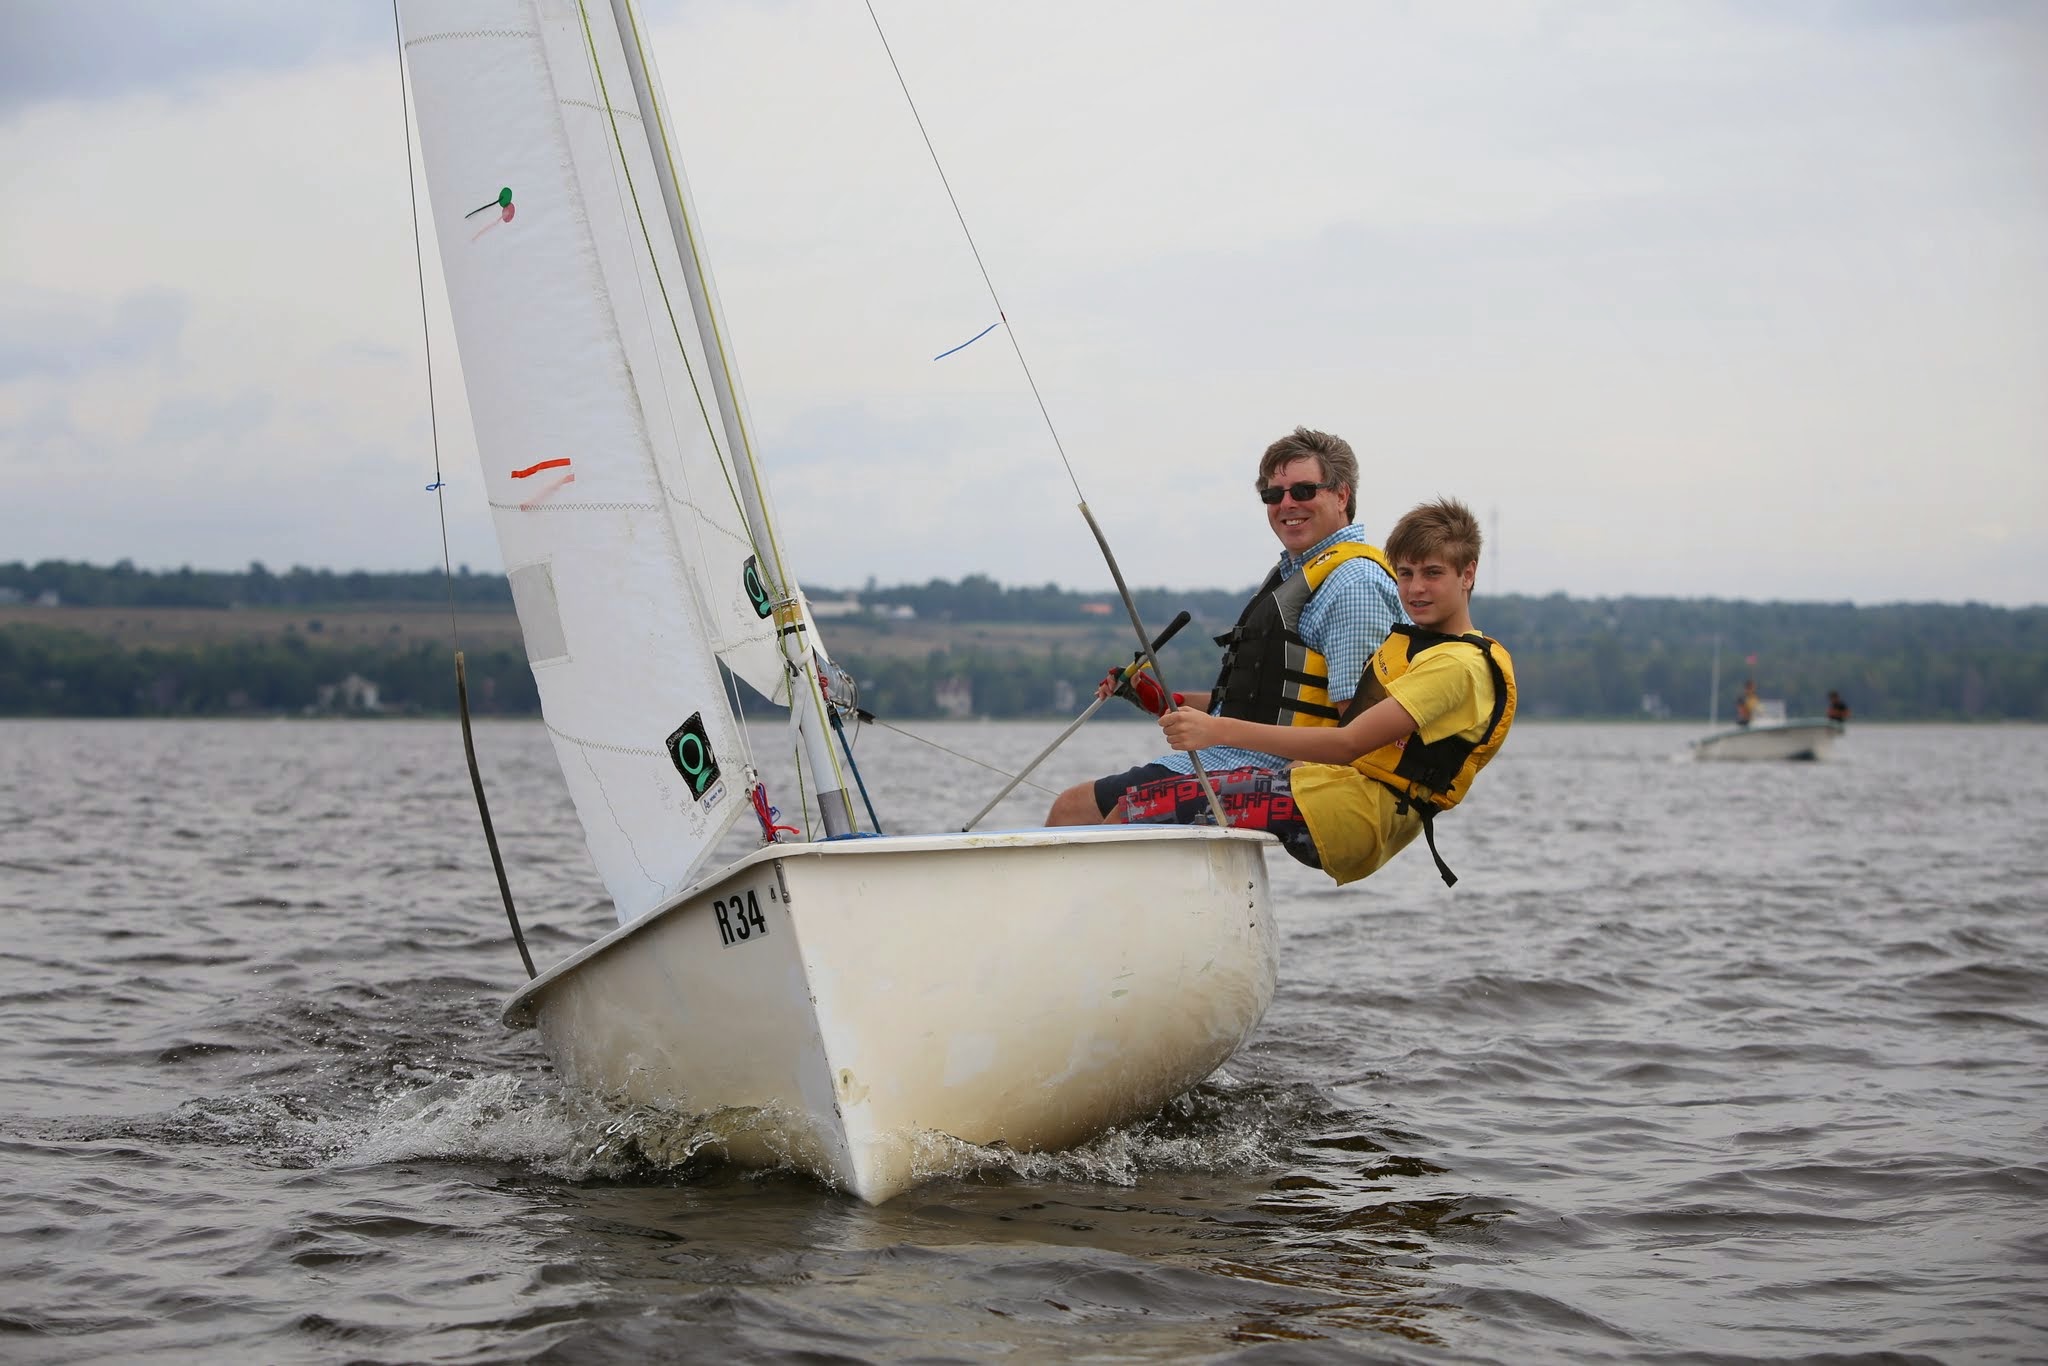
This off-the-water class was concerned with the physics of sailing. Tom did his “Theory from Hell” lecture (thanks, Tom!) and Reese spoke about how to apply the forces generated to the actual boat.
I’m going to present the information in a bit of a different order than was listed in the class. I’ll talk about the forces on a boat first, and talk (briefly) about how the sail force is generated later. We’ll discuss laminar flow, turbulent flow, and finally apparent wind.
But first… ready to take a review of Grade 12 Math?
Vector Math
A scalar (like the number 8) is a mathematical representation something that has magnitude (or size, or quantity). A vector is a mathematical representation of something that has magnitude and a direction. Forces on an object can be represented by vectors that are made up of how strong the force is (the magnitude) and which direction the force is pushing (the direction).
On diagrams, force vectors applied to an object are often drawn as arrows. The direction of the arrow shows the direction in which the force is applied. The placement of the arrow shows where the force is applied. The length of the arrow shows how much force is applied (the longer the arrow, the more force).

We use vectors in sailing to understand how forces affect the boat, how apparent wind changes as the boat moves, and to understand how the heck we can sail “into” the wind. Don’t worry, we won’t be doing number-crunching. We’re more concerned with “push here to turn left”, not “calculate how fast you turn left when you push here exactly this hard”
Breaking down and summing vectors
Just like scalars can be added together (8 + 6 = 14) vectors can be added. If the vectors are in the same direction, adding them up is just like adding numbers (if the wind is blowing 6 knots from the north, and speeds up by 6 knots from the north, then the result is that it is blowing 12 knots from the north). When vectors have different direction, the adding is not quite as simple (if the wind is blowing 6 knt from the north, then speeds up by 6 knts from the east, then the result is 8.5 knots from the north-east). We won’t be doing any number crunching or trigonometry, it’s just something to be aware of.
Just like adding two vectors into one vector, a vector can be broken down into two (or more) smaller vectors called components. In the above example, a 8.5 knot wind from the NE can be thought of as “6 knots from the N and 6 knots from the E”. Vectors are usually broken down into components that are perpendicular to each other (like N and E), but you can break them down into components of any direction as long as they add up to the same thing.

We’ll see summing and breaking down vectors more as we analyze how the foils counter the sail and how the apparent wind works.
Torque
In the real world, when we push or pull on something off-centre, it tries to turn. Let’s take the example of a canoe floating beside a dock. If we push on the middle of the canoe, it moves sideways. If we push on one end, it moves sideways, but also tries to turn. This turning force is called “torque”. If we want to turn the canoe only (without it moving sideways) than we can push on both ends of the canoe in opposite directions. The “sideways” parts of the pushes cancel each other out, but the torque from each push is added.
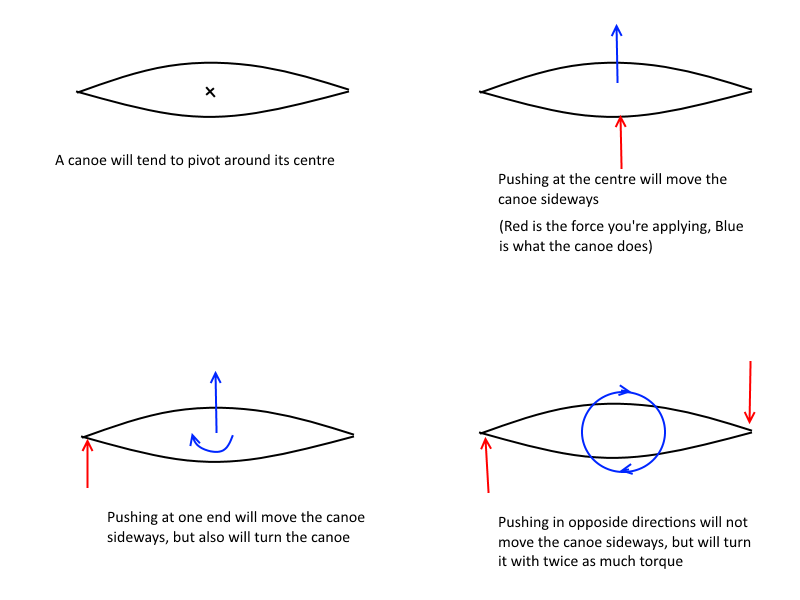
The torque produced is proportional to the distance from the pivot point. That is, if you push with the same force at a distance twice as far from the pivot point, then the torque is doubled. That’s why it’s easier to loosen a bolt with a long wrench than with a short one.
Equivalency Vectors
Dealing with tonnes and tonnes of vectors is hard. Often times though we can replace lots of vectors with one vector. Let’s say that you have a bunch of people pulling or pushing on an object to move it. For the purpose of analysis, you could replace all the forces that people are applying with a single force that represents the sum of their effort. As long as the equivalent vector applies the same net force as all the individual efforts, and the same torque as all the individual efforts, you can concentrate only on the one vector to make the math easier.
Forces on the Boat – CE and CLR
The Sail, and Centre of Effort (CE)
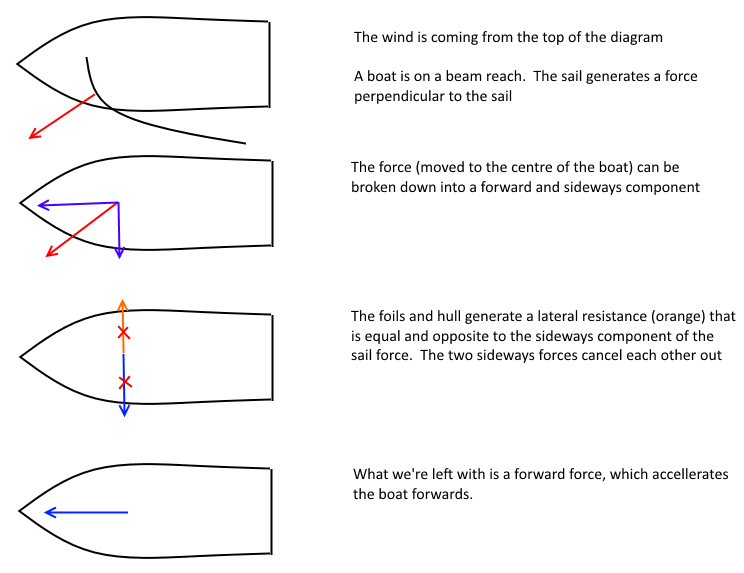
The wind blowing across a sail generates a force on the sail. This force is part forwards, part sideways. Got it? Good! Hey, that was easy!
While the sail actually has lots of little forces pushing against the sail all over it (perpendicular to the sailcloth), you can imagine it as one big force. This force (which we’ll call the effort) is applied about 1/3 the way along the sail and about 1/3 the way up the mast (in other words, not quite the middle, but pretty close to where the sail is “baggiest”). The point at which the force is pushing is called the Centre of Effort, or CE.
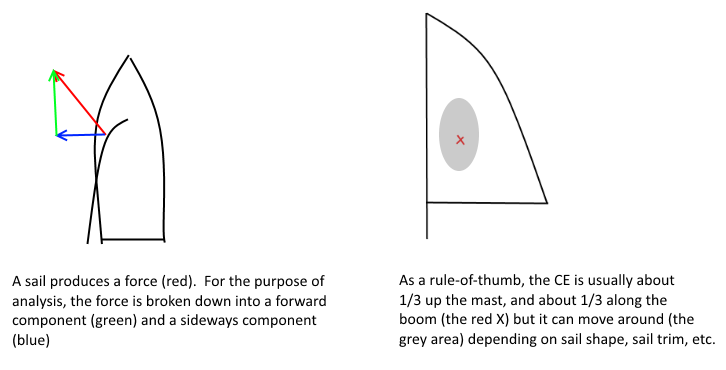
The direction of effort is (roughly) perpendicular to the sail at the sail’s deepest point. It generally points forwards some amount, and to leeward some amount. A fuller or tighter sail can change the direction somewhat, but it’s okay to think of it as pretty much perpendicular to the sail.
CE on Boats with 2+ Sails
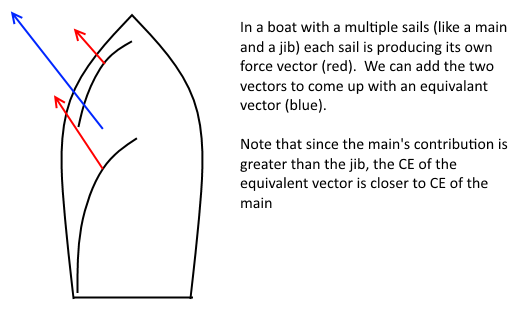
The above talks in terms of CE in a boat with a single sail. The principals are the same for a boat with a jib. Some points before we take a look at double-handers:
- There are two sails generated forces — we’ll have to add them up
- The main is usually bigger than the jib, and usually generates more force — our combined CE will be dominated by the main’s contribution
- The mast is usually a bit farther back on double-handers
This means that the force generated by the main is a bit farther back in the boat, but we have a new force generated by the jib forward. The jib force is generally smaller than the main. The sum of these two forces is between the two individual forces, but closer to the main force.
The total CE generated by the sails will generally be close to the mast, but a little bit behind.
Some boats have a third sail that goes in front of the jib called the spinnaker (typically only raised when going downwind). This sail also generates force and the CE will be moved forward farther when the spinnaker is raised. The same principals apply on boats with multiple masts, or multiple sails.
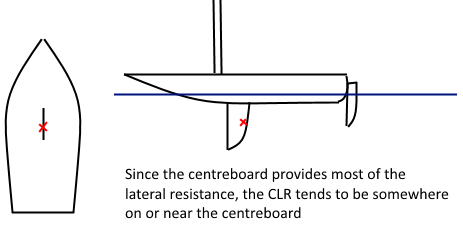
The Foils, and Centre of Lateral Resistance (CLR)
This one is not quite as intuitive as the sail(s).
Picture a canoe. The canoe is easy to push forwards/backwards, but tougher to push sideways, right? The shape of the canoe (narrow in one dimension, wide in the other) resists the sideways motion. This is called “lateral resistance”.
Sailboats have hulls that produce some lateral resistance, and the rudder produces some as well (when it’s straight), but the majority of the lateral resistance comes from the centreboard (or dagger board, or keel, or whatever you call the “fin” that sticks down into the water — I’ll just call it the centreboard). A few sailboats (like the Hobie 16) don’t have boards, so the hull is shaped to provide extra lateral resistance. For the purpose of this analysis, we’re talking about boats with boards.
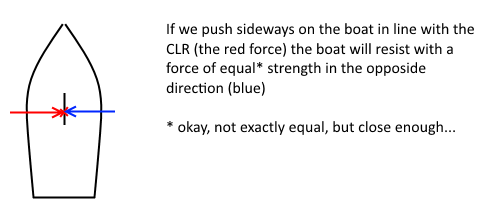
Just like we were able to take all the little forces on the sail and come up with an equivalent force applied at the centre of effort, we can take all the little lateral resistances and do our analysis based on a single force generated at the “centre of lateral resistance” or CLR. Since we’ve already mentioned that the centreboard is providing most of the lateral resistance, you won’t be surprised to learn that the CLR for the whole boat tends to be pretty close to the middle of the centreboard.
Sailboats generally produce a lot of lateral resistance, much more so than a canoe. They make so much, that we often “cheat” in our analysis and say that the boat doesn’t move sideways at all. If we apply 100 pounds of sideways force to a sailboat, we’ll say that the boat produces 100 pounds of resistance, and doesn’t move sideways. It actually does move sideways a little bit, but for the purpose of this write up we’ll say it doesn’t.
A note on terminology — “foils” or hydrofoils are the thin blades move through the water and generate forces. In the boats we’re talking about, the centreboard and rudder are the foils. There are a few types of boats which have horizontal or angled foils. Rather than produce a force to resist the boat moving sideways these produce an “upwards” force to help lift the hull out of the water. You can get some pretty amazing results with this, but when this page talks about “foils” we’re taking centreboard and rudder, not lifting foils.
Drag
Just like a boat resists moving sideways, the hull and foils of a boat also resists moving forwards or backwards. This resistance is called “drag”. Drag is usually much less than lateral resistance though. (Warning: math incoming) Drag tends to increase proportionally to the square of speed of the boat. That is to say, a boat going twice as fast generates four times as much drag, everything else being equal.
In a moment we’ll see a sail generate a forward force on the boat. We know that an unbalanced force causes something to accelerate (Newton’s 2nd law). As the boat speeds up, the drag grows until the forward force equals the drag force (at our top speed). Later on in the class, we’ll be (I assume) talking about things we can do to reduce drag to increase our top speed. For now though, our analysis does not take drag into account.
Applying CE/CLR
Analysis without considering torque — how does a boat sail upwind?
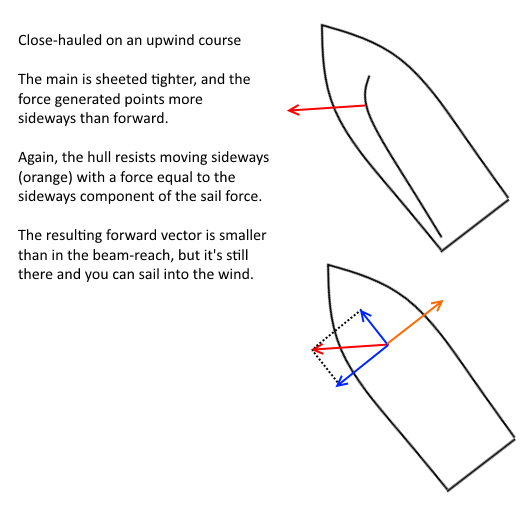
We’re going to first consider a beam reach (we’re sailing perpendicular to the wind) because it makes more intuitive sense, at least to me.
For the purpose of this analysis, we’ll consider all forces as if they act on the “middle” of the boat, without generating torque. That part comes later…
Adding Torque to the Equation
Terms to know – weather helm and lee helm
I’d like to talk about two terms we’ll be using. For some reason, the direction the wind is coming from is sometimes called “wind” (as in “windward”) but it’s also sometimes called “weather”. The direction the wind is blowing to is “lee”. The various forces on the boat might be exerting a torque on the boat, trying to turn it into the wind (“weather helm”) or away from the wind (“lee helm”). Most boats are designed to have a small bit of weather helm when sailed properly. This will turn the boat into the wind and stop the boat if the skipper falls off or lets go of the rudder, or something.
Torque to roll the boat
Probably the easiest effect of torque to understand is how a boat stays upright. That’s because we’ve all hiked out on a boat, and we’ve all experienced the effects of moving around while hiking.
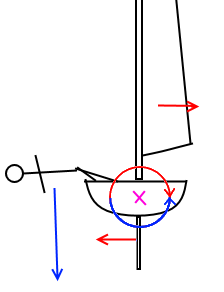
We have the wind pushing on the sail. For this analysis, we’re looking at just the “sideways” part of how the wind pushes, and not the forward part. The wind is pushing some distance up the mast, at CE. Counter to this, we have the lateral resistance in the opposite direction somewhere below the waterline. Remember our canoe example at the top of this post? The two forces pushing in opposite directions some distance apart are working together to torque the boat around a pivot point. In the diagram below, these forces (red) are producing the red clockwise torque around the pivot (purple X). This is the torque which will heel the boat and capsize if you don’t do anything to stop it
To counter that torque, we need to exert an equal amount of torque in the counter-clockwise direction. We do this by hiking. Gravity exerts a force on our body, which is transferred to the boat using our legs as levers. The heavier we are (the more downward force) or the taller we are (the farther away from the pivot the force is applied) the more torque is generated. Jason uses this as an excuse to have a second helping of desert. You want to apply just the right amount of torque such that the boat stays flat.
Let’s look what happens when the boat heels.
First, there is less sail area presented to the wind, so the sideways force (red arrows) become smaller. Second, the CE moves “down” toward the waterline as the mast tilts. The CLR moves “up” as well. All this means the red vectors (which are smaller anyway) are vertically closer to the pivot point, providing less torque. The net result — less hiking force is needed to keep the boat steady.
In strong winds, even the tall heavy sailors can’t generated enough torque to keep the boat flat. Most of the time, you’ll see a fleet of Lasers sailing along, all with a bit of heel according to the skipper’s ability to generate righting force. Good Laser sailors know that sheeting out to spill some wind (reducing the size of the red vectors) results in a flat boat and less drag, and generally go faster than the kids who try to hold all the wind in their sail and heel too much. To put it another way, the good sailors will generate as much torque with their body as they can, and then adjust their sail to their body. The other sailors will try to generate as much sail power as they can and then wrench their body trying to tame it (and fail to do so).
If you get a chance to watch Steve Harrington on the water at a KSC club race, he’s a perfect example. The guy’s 145 pounds, 5’6″ and his Laser is dead flat in even the strongest winds. He’s also winning every race.
Torque Affects of CE and CLR on weather helm and lee helm
Let’s look at the boat from the top. This is similar to what we did when we looked at how we sail upwind, but now we’ll look at the torques the different forces generate.
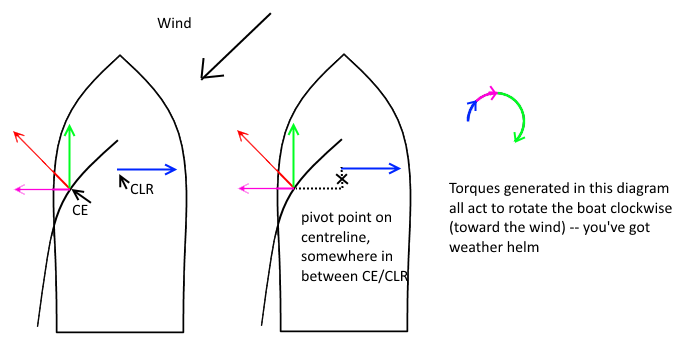
The boat will tend to pivot at some point between the CE and CLR. The two sideways components (blue and purple) will together torque the boat in one direction. If CE is behind CLR, then they’ll be rotating the boat into the wind (weather helm). If CE is in front of CLR, then they’ll rotate the boat away from the wind (lee helm). If they are perfectly lined up with each other, then they won’t be torquing the boat at all. The forward component of the sail (green) will however torque the boat (weather helm), even if CE and CLR are perfectly in line, since it’s pushing forwards off-centre to the pivot point
Moving CE/CLR to steer
Let’s take a look what happens to CE and CLR around the boat.
Let’s say you were to move CE forward in the boat. What would happen? The sideways components (purple and blue, above) wouldn’t have has much leverage around the pivot point, and you’d have less weather helm. If you move CE so far forward that it’s in front of CLR, you’re actually generating lee helm with those sideways forces.
Now what about that green “go forward” component? If you roll your boat to windward (that is, towards the right side of the diagram above) then you can move your CE to the point where it is directly above CLR. This would eliminate the green torque component.
How would you move CE forward (or back) in the boat? Sheeting the main in would move CE farther back and in towards the centreline. Sheeting out would move CE forward, but away from the centreline. Sitting farther forward in the boat would tilt the mast forward (and tilt the centerboard backwards) to move CE/CLR forward/back. Hiking the boat to windward would move CE towards the centreline, and heeling to leeward would move it away from the centreline.
So to steer without a rudder you would:
- To turn into the wind, generate weather helm
- move back in the boat to move CE backwards behind CLR (more blue/purple torques)
- stop hiking so hard, let the boat heel to leeward to move CE out and away from CLR (more green torque)
- sheeting in would increase force from sideways components (more blue/purple force, thus more torque), move CE back (more blue/purple torque) but would also move CE in towards the centreline (less green torque). Sheeting in is usually a net gain in weather helm
- To turn away from the wind, generate lee helm
- move forward in the boat to move CE forward ahead of CLR
- hike harder, heel the boat to windward to move CE in closer to the centreline of the boat (less green torque)
- sheet out to move CE ahead (reduces blue/purple torques, but increase green torque). Sheeting out is usually a net gain in lee helm
On a double-handed boat, you can also use the jib. Picture the scenario where you let one sail (either the main or the jib) do all the work, while the other one just flaps around
- if you’re using the jib to generate all your power, the CE is very far ahead of the CLR, and you turn away from the wind
- if you’re using the main to generate all your power, the CE is very far behind the CLR, and you turn towards the wind
Thus, it’s quite easy for a single sailor to sail a double-hander without a rudder — let one sheet loose, and yank on the other. You can play with how much of each sail you’re applying until you find a balance that keeps you straight.
How a Sail Generates Forces
I’m not touching this one.
There are countless articles written about how a sail generates force, many of which contradict each other. Most resources you’ll find online either
- oversimplify things to the point at which they are flat out wrong
- present part of the physics while ignoring others, leaving questions unanswered
- insult people who present a different model of how a sail works
- all of the above
- all of the above, and then they claim that you’re just not smart enough to understand
In other words, it’s the airfoil teaching effect:
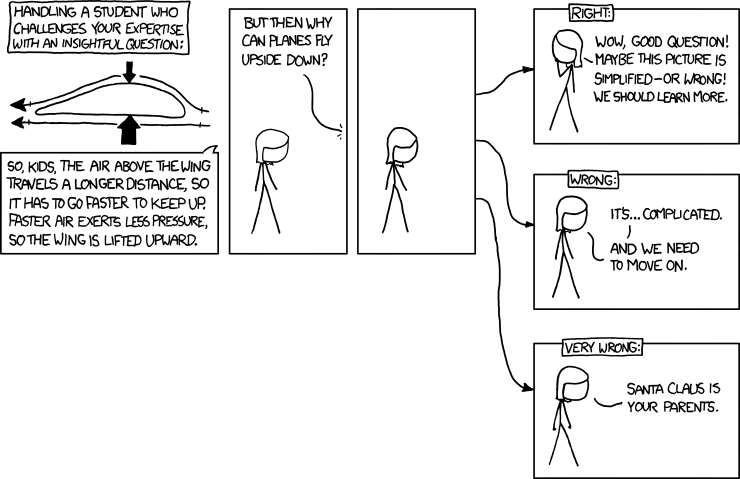
(image used with permission, original source https://www.xkcd.com/803/)
In my humble opinion, knowing how to use the force is more important than knowing the details of how it is generated.
Turbulent and Laminar Flow
I will speak briefly on turbulence. A fluid (air, water, etc) will tend to flow in nice straight lines (laminar flow). When it encounters an object, it has to go around the object. If the object is fairly small, is nice and smooth, and allows for gradual flow around the object, you can have laminar flow around it. If the object forces abrupt changes in the direction of the fluid, you create turbulence, and eddies or swirlies are introduced into the system.
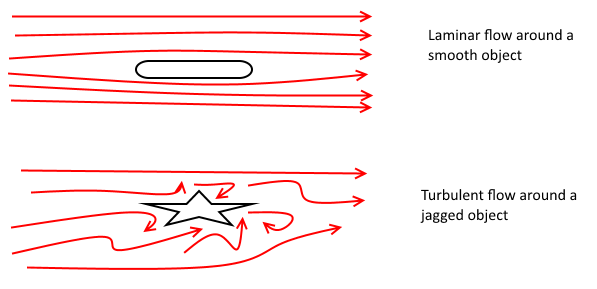
When laminar flow is established can be harnessed to generate the sail and foil forces with minimal drag. When a flow becomes turbulent the amount of force we can generate drops significantly, and the amount of drag increases. To put it another way, we’d like all the fluids moving around our boat to have laminar flow if possible.
How do you know you have laminar flow? Look at the tell tales on your sail. If they are streaming backwards, they’re getting caught in the laminar flow as the wind blows across your sail. Great! If your tell tales are spinning around, flapping forwards and then back, or other erratic behaviour, then they are getting caught in one of the eddies, which indicates you have turbulent flow. Turbulent flow means your sail is not generating as much power, and there is more drag on your rig.
We can’t see tell tales on our foils, but we can look at the water behind the boat. If the water in our wake is relatively smooth, then then foils are not generating much turbulence. If our wake is full of bubbles, and little whirlpools, then its and indication that our hull is dragging significantly. Reducing hull drag is beyond the scope of this write-up, but try sitting farther forward in the boat and using less rudder if possible.
Apparent Wind
True wind is what the wind is doing relative to the ground (or water, or other stationary point). You may be in a lull, or a gust, or just steady wind. Whatever the case, if the wind is blowing 10 knots from the North relative to the surface, then that is the true wind at this point in time.
Induced wind or boat wind is the wind that’s created by moving across the surface. If the true wind is dead still, but you’re riding a bicycle at 30 km/h then you “feel” a wind on your face as if it’s blowing 30km/h right at you. That’s induced wind — wind created by your motion over the ground.
Apparent wind is the combination of the two. Let’s say the wind was blowing at 10 km/h and you were riding a bike at 30 km/h directly into the wind. You would “feel” 40 km/h (10 km/h true wind, plus 30 km/h induced wind). If you were biking away from the wind, you would feel 20 km/h. If you were biking sideways to the wind, you’d “feel” the wind come at you at about 32km/h from and angle about 32 degrees.

When you are travelling slow, the induced wind is small, and apparent wind is pretty close to true wind. When you are travelling very fast the apparent wind becomes closer to the induced wind.
You’re sails operate on what they feel — the apparent wind. So if you’re at a standstill on a beam reach, your sails “feel” the true wind coming from directly beside you. As your speed increases, you’ll be generating more induced wind. This will make the wind “appear” to come from more in front of you. As you speed up, the boat may move from a beam reach to a close reach, even to close hauled just be speeding up.
Another example is gybing a Laser in strong wind. You want to be going as fast as possible when you gybe. If the wind is blowing at 20 knots, and you’re going 5 knots in the direction of the wind, then there’s 15 knots of apparent wind coming behind you. Tough as hell to gybe that. But, if you’re going 15 knots downwind, then there’s only 5 knots of apparent wind coming behind you. That’s a walk in the park! So catch a wave, get up on a plane, do whatever you need to do to speed up that boat heading into that gybe!
Side note – Some boats can sail faster than the true wind on reaches. That’s because it’s not the 5 knots of true wind that is operating on the sail, it’s the 20 knots of apparent wind that the sail is using. The 29er, for example, will sail at a speed of about 18 knots on a broad reach in 12 knots of wind, and you’re actually “tacking” through the apparent wind when you gybe.